Hike the W Trek in Patagonia (Complete How-To Guide)
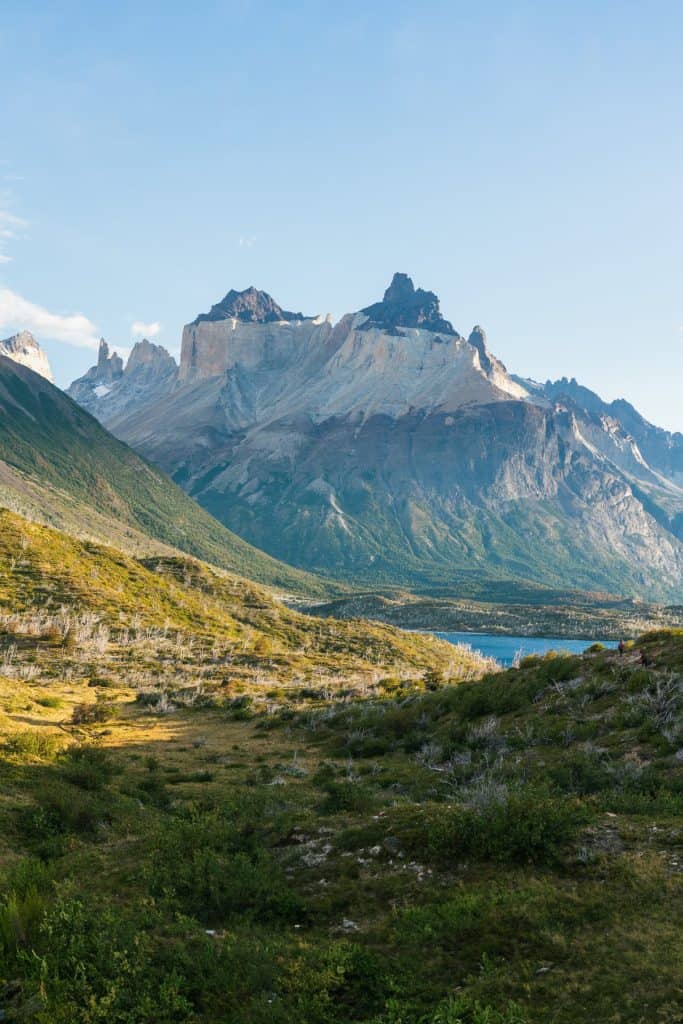
The W Trek in Patagonia’s Torres del Paine is a magical multi-day hike. This point-to-point trail takes you by glaciers, granite mountains, horn-shaped spires, forests with trees only found in Patagonia, and jaw-dropping turquoise alpine lakes.
Trying to figure out if the W is worth the long trip down to Patagonia? There’s a reason why it’s so popular – and let me tell you, it’s so worth it! Whether you’re an experienced backpacker or brand new to multi-day hiking, you’re going to be impressed with the W.
I hiked the W Trek as part of the longer O Circuit backpacking trip, joining the route at Camp Grey. While I loved the O Circuit, I can definitely say that the best parts of the hike are on the W side! So if you’re limited on time and only have 5 days to spend in the park – you’ll be very happy with the W.
I’m going to fill you in on everything you need to know to plan your hike on the W – from trailhead options and transportation, to where and when to book your campsites or dorm rooms, common itineraries, and what you need to pack to be comfortable and safe on trail!
Backcountry Emily contains affiliate links and I may receive compensation - at no extra cost to you! As an Amazon Associate I earn from qualifying purchases. See my Privacy Policy for more information.
W Trek: The Basics
The W trail is located in Torres del Paine National Park in southern Chile, near the town of Puerto Natales.
The W is one of the most famous multi-day hiking routes in the world, and the most popular trip in Torres del Paine! The trail earned its name by the route looking like the letter “W” on a map.
This trail is a point-to-point hike and can be hiked in two different directions: east to west or west to east! There are three different starting trailhead options, and there are multiple ways to make the trail longer or shorter, depending on your experience and daily energy.
W Trek Trail Overview and Statistics

Who Should Hike the W Trek in Torres del Paine?
The W Trek is great for so many different kinds of hikers – one of the reasons why it’s so popular! The W Trek is for you if:
- You want to experience the most popular sights in Patagonia, but can’t commit to an 8 day trip (like the O Circuit).
- You’re a beginner backpacker and want more support on a hiking trip.
- You’re looking for a hut-style overnight trip where you only need to carry a day pack.
- You want a little bit more adventure than day hiking in the park.
👉 Read this if you’re still debating between the W Trek and O Circuit.

Best Time to Hike Patagonia’s W Trek
The Patagonia region has summertime from November – mid-March, and this will be the best time to hike the W Trek. It is possible to hike the W in the spring (October) and the fall (mid March – April), but the weather is more dicey, and trails could still be closed by the park service.
Torres del Paine is technically still open from May – September, but you’ll need to visit the park with a guided tour, like the packages offered through Vertice, one of the refugio companies in the park.
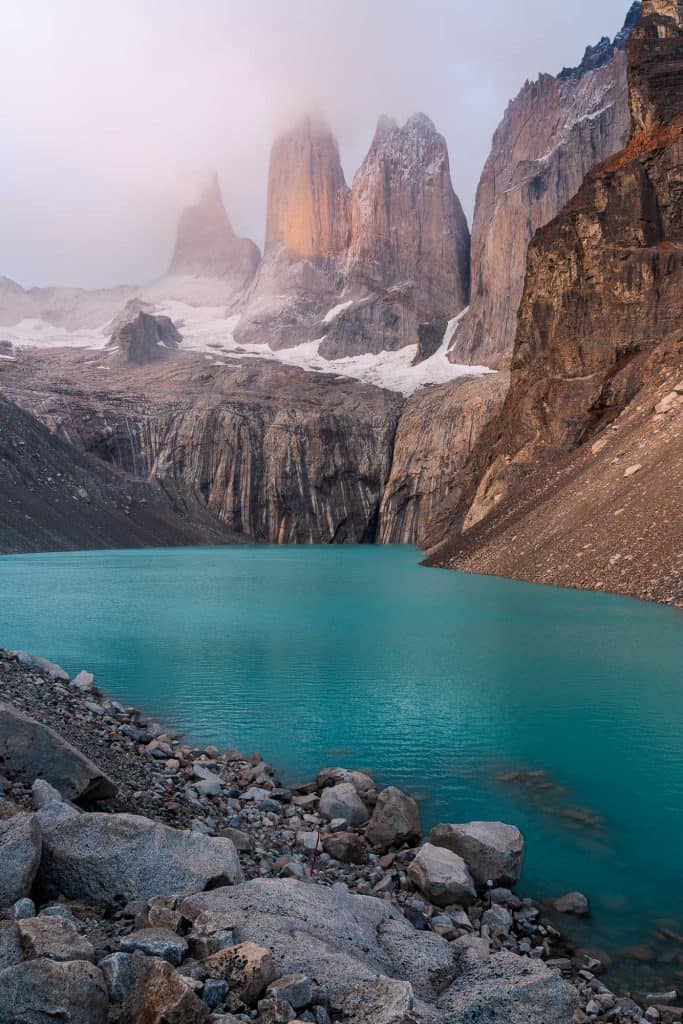
I hiked the W as part of my O Circuit loop in late January and experienced crazy winds, beautiful calm, sunny days, and even a small amount of snow at Lago Torres at sunrise – all four seasons, even in summer!
Personally, the next time I visit, I’d love to go at the end of March or early April to experience the fall colors in Torres del Paine. Fall is also a little less windy than the summer.
Weather on the W Trek
I experienced all four seasons on my W hike – in the middle of summer! The majority of my days were nice and sunny, but the infamous Patagonia wind was very present, especially on the day between camps Grey and Paine Grande.
You can’t visit Patagonia and expect perfect weather every day. You have to be prepared for inclement weather: rain, hail, snow, and winds up to 80 miles per hour!
My W Trek Itinerary: Daily Breakdown
I hiked the W as part of the O Circuit, so my W trek itinerary was very linear. I’m going to show you my hike and below give an alternate itinerary example for a westbound W Trek.
Map of the Route

Day 1: Grey to Paine Grande
- Distance: ~6.5 miles
- Elevation: ~ +1,200 / -1,300 feet
- Highlights: Views of Lago Grey, some waterfalls, and one of my favorite views of Glacier Grey!

Day 2: Paine Grande to Frances
- Distance: ~12.5 miles
- Elevation: ~ +3,000 / – 2,600 feet
- Highlights: This includes the hike all the way to Mirador Britanico, which I highly recommend. It is one of the most unique views on the entire trail and you should not skip it! This is probably the most beautiful day of the entire hike!

Day 3: Frances to Chileno
- Distance: ~9.6 miles
- Elevation: ~ +2,450 / -1,750 feet
- Highlights: Views of Lago Nordenskjöld are incredible here! You hike right on the pebbly beach of the lake. I loved the views around Refugio Cuernos too – very beautiful.

Day 4: Chileno to Central via Lago Torres
- Distance: ~8.8 miles
- Elevation: ~ +2,200 / -3,100 feet
- Highlights: Lago Torres, of course! The most iconic viewpoint in the park! You don’t want to miss it and you should get there are early as possible to enjoy it with as few people as possible. I did it as a sunrise hike.
Alternate Itinerary Options
Hiking the W trek westbound, your itinerary might look something like this:
Day 1: Central – Lago Torres – Central
- Distance: 11.8 miles
- Elevation: +/- 4,000 feet
Day 2: Central – Frances
- Distance: 9.7 miles
- Elevation: +2,100 feet, -2,000 ft
Day 3: Frances – Paine Grande
- Distance: 12.5 miles
- Elevation: +2,600 feet/ -3,000 ft
- If you skip Vallé de Frances: 5.1 miles, +500 ft/ -900 ft
- If you visit Mirador Frances only (skip Britanico): 8.4 miles, +1,700 ft/ -2,100 ft
Day 4: Paine Grande – Grey
- Distance: ~6.5 miles
- Elevation: ~ +1,300 / -1,200 feet
Day 5: Grey – Paine Grande – Pudeto (end)
- Distance: ~6.5 miles
- Elevation: ~ +1,200 / -1,300 feet
The distance between Cuernos and Frances Refugios is 2 miles. The elevation going westbound is +750 feet/ -450 ft. If you need to make day 2 a little easier, it might be worth it to stay at Cuernos vs. Frances.
Should You Hike to Mirador Britanico?
Yes. Seriously – it is really stunning. I think if you are traveling all the way to Torres del Paine and you don’t hike to Mirador Britanico, you’re doing yourself a disservice! It’s just so unique!
Here’s the secret too: the climb to Mirador Frances in Valle Frances is a kicker. I was definitely feeling it on my hike and wasn’t too happy about it. But – the trail gets so much flatter once you pass the Frances viewpoint. So if you’re feeling tired, take a nice break at the Frances view, give the legs and lungs a rest, and then keep hiking – you won’t regret it!

Where to Start Your W Trek Hike: Trailhead Options Explained
Central, Grey, and Paine Grande are the three trailheads for the W Trek.
If you start at Central, your first night could be at Central or at Chileno, and you’ll hike to the most famous lake – Lago Torres – at the start of your hike.
I’d recommend trying to stay in a rented tent at Chileno and hiking to the lake in the early morning – it’ll be less crowded vs. doing it at the same time as day trippers.
If you start at Grey, your first night will be at Grey or at Paine Grande, depending on when you arrive and if you want to hike on your first day.
If you start at Paine Grande, you will most likely hike to Grey to spend your first night at Grey, and your second night at Paine Grande. If you’re ambitious though, you could spend the night at Paine Grande and day hike to Grey and back vs. camping there.
Starting the W at Paine Grande vs. Grey
Starting (or ending) your W hike at Paine Grande is logistically much more simple than Grey.
A ferry across a lake is involved no matter which one you start at, but it’s a much shorter drive and shorter boat ride from Pudeto to Paine Grande.
There are also more ferry departures from Pudeto than Lago Grey to the trail.
If you want to complete the full W trail, you’ll hike to Grey from Paine Grande and then backtrack back to Paine Grande to continue hiking. You should definitely do this: getting to see the Grey Glacier is a highlight of this hike!
However, starting (or ending) at Grey without backtracking to Paine Grande might give you some extra time to enjoy this area of Torres del Paine. You might have more time to do things like:
- Hike on the O portion of the trail up to the suspension bridges (4 mi, 1,000 ft elevation round trip)
- Explore the beaches and views more around Refugio Grey
- Take a guided tour to walk on Glacier Grey or kayak up to it – with BigFoot Patagonia.
If you start or end at Grey, you might want to look into staying at Hotel Lago Grey, which is where the ferry to Grey starts from.

W Trek Campgrounds vs. Refugios
You can hike the W as a full backpacking trip with camping every night, or opt for more comfort and complete the hike hut-to-hut style and stay in a bed inside a building each night.
Unlike the O Loop where you will have to sleep in a tent some nights, the W Trek has rooms available every night of the hike.
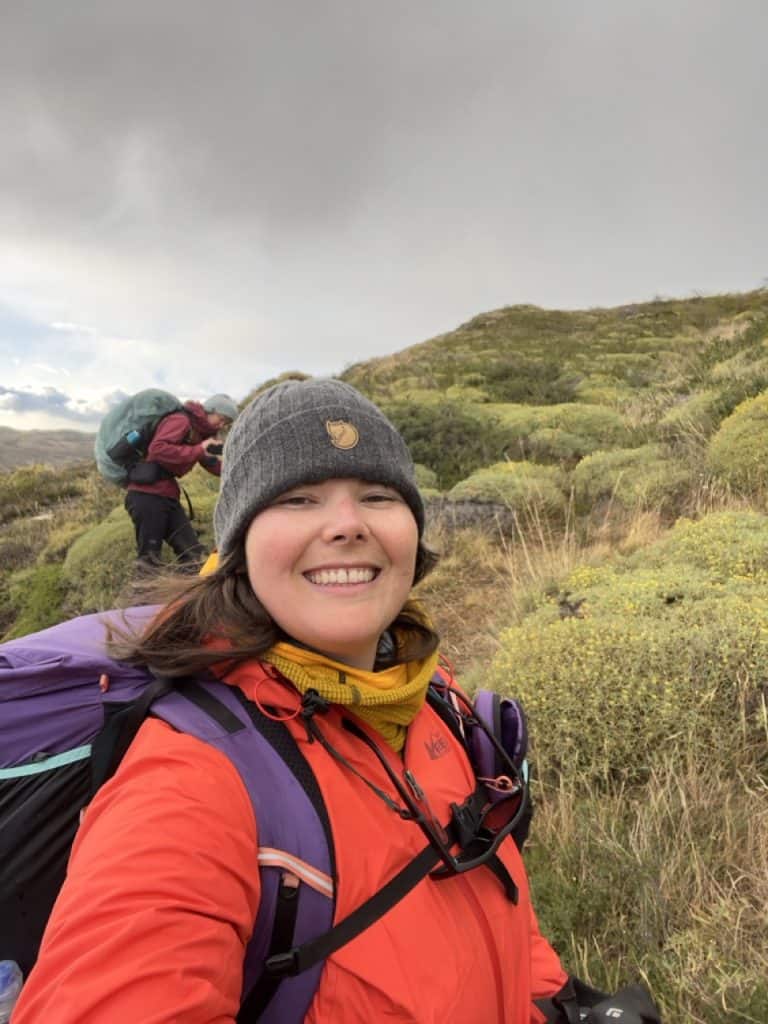
I completed the W as part of the O Circuit, so I camped in my own tent at each W campground and it was great, and how I’d recommend doing this trail if you already like backpacking and want to save money.
But many people I speak to choose to hike the W specifically because staying in the indoor Refugios is easier logistically and physically, and they want to enjoy the hike more as day hiking & enjoying their evenings at the Refugio bar vs. camping style.
Staying at the Refugios does cost more money, but is easier to secure reservations for, and hey, you still hike the full trail – you just get the comfort of a real bed at night!
You can do a combo of either option as well: all the Refugios have pre-set tents, so you could choose that option vs. staying inside. You can also decide to book meals if you’re fully camping or staying in the Refugio. Or, you can bring all of your own food and cook it in the camp area (you’ll need to have your own stove though).
The flexibility is nice either way – you’ll just need to decide which way works best for you and what is available at the time of booking.
Read next: In this post, I go in-depth on each campground and Refugio of the W with loads of photos and services offered so you know what you’re getting!
Food on the W Trek: Bring Your Own or Buy There
I mentioned it above, but you have 2 options when it comes to food on the W! Most people who are camping every night will opt to bring their own food, while most staying in Refugios nightly will choose the dining option at the Refugio. But you don’t have to follow these “rules”.
Bring Your Own Food
- Save money
- Your pack will be heavier
- You need to bring your own stove & fuel
- More flexibility in eating & hiking times (no need to wait for designated meal time)
- If you run out of food, there’s pasta and rice & other meal items you can buy to cook in the refugio stores
Meals at Refugios
- More expensive ($70 – $130 USD depending on half or full board)
- Lighter pack – just need to carry lunch & snacks
- Must wait for food service times to eat
- Usually need to book meals at time of booking lodging
A La Carte Dining
Each of the Refugios on the W have some kind of “a la carte” dining option – mainly for lunch and dinner. Each Refugio has different hours for their kitchen – they’re not always open for ordering à la carte as their main priority is the full meals for guests who have purchased full/ half board.
A la carte options are basically just hamburgers & pizza – so not a ton of variety. But the pizza at Grey and Paine Grande was really good – I’d recommend it at least once!

How To Make W Trek Reservations
There are two companies that maintain the Refugios and campsites on the W trek. Vertice and Las Torres. You’ll need to make reservations through them separately for each night on the trail.
However, it can be annoying using 2 different companies and booking twice and trying to piece together a full hike when you can’t see the full availability for the other company on the other website. Las Torres’s website is particularly horrendous to use and look for openings.
So to make it easier, Torreshike.com lets you input your full availability (you can search for openings for the entire season!) and shows you every single option available for booking without having to re-do searches on both platforms a million times.
Torres del Paine Park Entry Ticket
You need to pay the park entry fee ahead of time online to enter Torres del Paine National Park.
There are two tiers: one for people staying less than 3 nights ($39 USD) and people staying 4+ nights ($55 USD). You can book this here, or if you’re using TorresHike.com to make your backpacking reservations, you can have them purchase your entrance ticket as well.
Most W trekkers will be staying 4+ nights, so you’ll book the more expensive entry ticket.

Getting to Torres del Paine National Park & Your Starting Trailhead
All buses to Torres del Paine begin in Puerto Natales, Chile, the town closest to the National Park. It’s pretty easy to get here from multiple cities in the Patagonia region like El Calafate, Ushuaia, and Punta Arenas via bus, or you can fly directly into Puerto Natales.
I used Busbud to book all of my buses in the Patagonia region and it worked great!
- Origin: Puerto Natales, Chile
- Destination: Torres del Paine
You might notice there are multiple destinations for Torres del Paine when selecting your ticket. Make sure you select the correct destination for your trailhead. Especially if you are starting from Grey – because the ticket is a little more expensive.
- If you are starting from Central, you’ll select Terminal Laguna Amarga.
- If you’re starting from Paine Grande, you’ll select Terminal Pudeto.
- If you’re starting from Grey, you’ll select Conexión Lago Grey.
If you’re starting from Central, you’ll take a park shuttle from Laguna Amarga to the main visitor center where the trail starts. This park shuttle cost $4,000 CLP in cash each way.
This park shuttle is mostly timed with the arrival and departure of the buses. I was anxious about missing the shuttle but it was not an issue. The visitor center will have a timed chart about the return shuttles back to Laguna Amarga when you’re done with your hike.
If you’re starting from Grey or Paine Grande, you’ll need to take the appropriate ferries from the bus drop-off points!
The Pudeto catamaran costs $27,000 CLP/ person and in 2025-26, leaves for Paine Grande at 8:30 AM, 10:30 AM, 4:15 PM, 6:00 PM. You can see the full schedule here.
It does look like the schedule can change year to year. I have a photo of the schedule from when I hiked in 2023 and the hours are different. They’re also slightly different in the slower months. So make sure you double check the times!
To sail from Lago Grey to Refugio Grey, you’ll want to read more here. It costs $100,000 CLP per adult one-way, and there are 3 departures daily.

Gear You Need to Pack for the W Trek
What to pack depends a little bit on if you’re staying in Refugios only or you’re camping and bringing all of your backpacking gear.
Clothing
- Hiking long sleeve, sweat-wicking sun shirt
- Hiking long pants, sweat-wicking
- Down hoodie
- Lightweight fleece (optional)
- Rain jacket
- Rain pants (optional but recommended)
- Sleeping layers (1 set)
- Bra (1) & underwear (1-2)
- Hiking socks (2)
- Sleeping socks (optional – 1)
- Light fleece gloves
- Waterproof mittens/ gloves
- Buff / neck gaiter
- Sunglasses
- Hiking shoes
- Camp shoes/ sandals
You only need to pack one hiking outfit, but you should be well prepared for the variable and extreme weather Torres del Paine can see – even in the summer. You should not skimp on your warm gear or rain gear on this hike. Layering is key!
In fact, I usually don’t bring an extra fleece in addition to a puffy, but I did on this hike and I was happy I did that – especially for hanging out around the refugios and in the cooking shelters.
If You’re Staying in Refugios
- Backpack (20-30 L)
- Sleeping bag liner
- Water bottles or reservoir (2-3 L total)
- Trekking poles
- First Aid Kit
- Basic toiletries
- PLB device
- Headlamp
- Phone
- Wall plug & converter
- Cords for your items
If You’re Self-Supported Camping
- Backpacking pack 40-60 L
- Tent – 3 season
- Sleeping bag or quilt rated to 20°F or warmer
- Sleeping pad
- Pillow
- Trekking poles
- First aid kit & gear repair kit
- Basic toiletries (including soap)
- Wallet
- Cooking stove
- Pot
- Eating utensil (spoon)
- IsoPro fuel (buy in Puerto Natales)
- Lighter
- Food bag
- Water bottles (2-3 L total)
- PLB device
- Headlamp
- Phone
- Small powerbank (10,000 mAh max)
- Wall plug & converter
- Cords for your items
I brought a dirty water bag and a water filter as well, but I never needed to use it – I always just filled up water at the campgrounds since all of them had potable water.
Required Documents
You will be asked to show documents at every single campground & Refugio.
- Your passport
- Entry Visa ticket (given to you at immigration/ border crossing when you enter Chile)
- Proof of reservations (camping/ lodging – take screenshots or print proof of these)
- Park entry ticket – you’ll be asked to show this at Laguna Amarga
I would have pictures of everything too. So always have the physical copy and take pictures of everything to keep on your phone in case something happens to the original.
Renting Gear
If you’re doing the W Trek supported & staying in Refugios, you probably don’t need to rent any gear.
If you’re camping though, and don’t want to travel with all of your gear from home, there are a few gear rental options in Puerto Natales that are cheaper than hiring the tent and sleep gear from the Refugio companies – obviously, you have to carry it all though!
I did not do this so can’t personally vouch, but I’ve heard that Rental Natales and Erratic Rock are two highly recommended rental shops. They also rent clothing and trekking poles!
What To Do With Your Other Vacation Gear
If you’re doing the W Trek as part of a larger vacation, you might have another bag of gear & clothes you want to store while hiking.
Luckily, I was able to store my extra gear at the hotel I stayed at in Puerto Natales the night after my hike. I didn’t have to pay anything extra too, which was so great!
Refugios Central and Paine Grande also have paid luggage storage on site if you’d rather keep your items in the park.
Navigating the W Trek
The W Trek is incredibly well marked. It would be very challenging to get lost on this trail – there aren’t many offshoots to lead you astray and the junctions are always signed!
What I did have downloaded was the general topographical map on GaiaGPS so I could see the route. I’m always a proponent of having maps on your backpacking trips, and the pro layers from GaiaGPS are my favorite to have on my phone.
The mapping on AllTrails Plus is probably sufficient for most hikers though.

Important Park Rules & Leave No Trace
Torres del Paine does have a few important park rules that you need to follow on your hike.
Probably the most important one: NO FIRES. You are not even allowed to use your camp stove outside of a kitchen building.
I actually got in trouble for this at Paine Grande: we wanted to start early in the morning because the hike for the day was super long and the staff had not unlocked the kitchen building yet, so I started boiling water on the picnic table outside the building and got a stern talking to from the refugio staff as he was unlocking the door.
They are super sensitive about this because of a devastating fire in the park years ago. So be smart, only light your stove inside a designated building and never build an open flame.
Another interesting rule is that trails actually have open and close times. On the W, you’ll mostly encounter this at Base Torres lookout.
At Base Torres, rangers will actually go up at 4:00 pm and round up everyone and tell them to hike down.
If you ever come to a chained portion of trail, you shouldn’t go past it because it is technically closed.
Trails also open at 6:00 am. I did not know this was a thing before starting my hike on the W and I did leave the Chileno camp in the dark to hike to Base Torres for sunrise because there was no sign saying you couldn’t on the trail at Chileno camp.
The main reason for these rules is safety: they don’t want to conduct search & rescue operations every day, and the weather tends to get worse in the afternoons/ evenings and hiking at night has its own risks especially if you are not prepared – like running into cougars or getting off trail and lost.
Another uncommon rule at the park is that swimming is prohibited in all park waterways – lakes, rivers, and lagoons. The cited reason is because of asphyxiation by immersion – aka the water is so cold that if you submerge your body you could go into shock and stop breathing, and then drown. This is definitely something that happens to people and can happen in any water of glacial runoff.
Other rules are common in wilderness areas: no drones, no smoking, no pets, no bicycles. And of course, following Leave No Trace ethics is important here as well. No littering, pack out your trash including peels, napkins, toilet paper, etc. Do not interact with wild animals, and stick to hiking on trails only.

Tips For a Fun & Successful Trek
Start Early Each Day
By starting earlier in the day on trail, you’re less likely to run into lots of people, which makes the trail seem less overcrowded.
Don’t Overpack
You’re covering a decent amount of terrain each day on this hike and doing a lot of climbing! Having a lighter pack will make your days easier and your joints will thank you.
Bring Earplugs and Sandals
These are easy to skip on other backpacking trips, but I think they’re essential on this one! You’ll want earplugs because you’ll be sleeping in close proximity to others: whether you’re camping or staying in the Refugio dorms.
Sandals are so much more comfortable to walk around in vs. your boots which could be wet and muddy from the trail that day. Make sure your sandals & socks are compatible with each other in case it’s cold and you don’t want bare feet.
Don’t Underestimate the Weather
Patagonia is known for its dynamic weather and gusty winds. I would be shocked if you had beautiful weather your entire trip. It’s just not something that happens for days on end in the region!
You will experience rain and wind for sure. And maybe hail and snow. And probably sunny blue skies! So go in expecting and preparing for variable weather and learn to embrace whatever is thrown at you!
Bring Evening Entertainment
I found myself getting to camp pretty early each day, so having something fun to do was nice. My group brought a deck of cards which was a fun way to bond and entertain ourselves instead of getting sucked into paying for (bad, slow) WiFi at the refugios.
Expect & Embrace Crowds
You’re about to hike the most popular route in the National Park. There are going to be lots of people on the trail – day hikers, O Circuit backpackers, and W Trek hikers too! The earlier you get hiking each day, the better, but you’re going to be in good company on this trek.
As long as you go in with that mindset and are polite – a Ciao! Or Hola! Goes a long way – you’ll be happier – trust me!

Hiking the W: Frequently Asked Questions
How difficult is the W Trek?
The W is an intermediate-level hike. Logistically, it is a little challenging to put together and some of the hiking days are intense.
If you have never hiked before, especially multiple days in a row, you will find this to be difficult. If you day hike regularly but have never backpacked before, you’ll most likely enjoy the challenge. And if you’re a regular backpacker in the USA – you’ll probably find this hike to be easier than what you’re used to!
Should I use a guide service for the W Hike?
I don’t think it’s necessary unless you have never hiked or gone camping before in your life. Even if you don’t want to carry all of your camping gear or food, it’s easy to book indoor accommodations on your own and hike the trail self-paced.
Which direction is better to hike the W Trek: eastbound or westbound?
I hiked the W eastbound and really loved the views. It always felt like we were walking toward something: whether that was the Paine Massif or Los Cuernos.
I also think hiking the W eastbound gives you a little bit more of a warm-up vs. your first day being the strenuous hike to Lago Torres.
Where do you go to the bathroom on the W Trek?
There are toilets at every campground and refugio on the W Trek, one at the junction to Mirador Britanico, and another during the approach to Lago Torres. If you need to pee or poop and you’re not near one of these toilets, you’ll need to walk 200 feet away from the trail and dig a hole 6-8 inches deep. You should bring a trowel to do this. Toilet paper needs to be thrown away – do not leave it on the ground or in the hole.
You also cannot flush your toilet paper at the campgrounds – you’ll deposit it in a waste basket in the stall. Another heads up: Chileno camp charges you to use the toilet unless you’re staying there. Be prepared with some cash or use the free toilet up the trail, closer to Lago Torres.
What footwear is best for the W Trek: hiking boots or trail runners?
I am pro-trail runners for backpacking: but I do all of my hiking and backpacking in trail runners, so my feet and ankles are very used to wearing them. I also am a fan of non-waterproof hiking shoes because they breathe so much better and dry much faster when they do get wet.
I wore non-waterproof Altra Lone Peak shoes on my hike and so did my friends, and I don’t think the trail is any more technical than hiking in the Sierra Nevada. But you should wear what you are most comfortable with, and if you decide to hike in waterproof boots, you should immediately take them off and attempt to dry them every time you get to a camp so they don’t stay boggy.
Is a water filter necessary for the W Trek in Torres del Paine?
I brought one and never used it – I just filled up my water for the day at the campgrounds before hiking out, and 2 liters of water was enough for my needs each day.
Do I need to speak Spanish to hike the W?
Nope, though as always when traveling to a country where you don’t speak the main language, learning a few words will go a long ways. Spanish is the most spoken language on the trail, but English is very popular as well and most staff speak English.

Next Steps to Plan Your W Trek Adventure
If you’re wondering whether the W Trek lives up to the hype – trust me, it does. This trail gives you front-row views of Patagonia’s most iconic landscapes, without needing weeks off work or elite backpacking skills to enjoy it.
With the right prep and expectations, the W can be both a challenge and a joy. Whether you stay in the Refugios or pitch your own tent, you’re in for an unforgettable experience that few other hikes can match.
Ready to take the next step?
👉 Check out my detailed breakdown of O & W Trek campgrounds and refugios to see what it’s like to sleep along this trail, or read my full guide to hiking the O Circuit if you’re considering the longer route.
🎒 When you’re ready to lock in your trek, I recommend this trusted booking platform – they make it easy to secure your route, lodging, and logistics in one go.
Happy trekking – and may the winds be ever in your favor out there!
Read Next
- Ultimate Guide to Torres del Paine National Park, Chile
- Best Places to Stay in Torres del Paine
- O Circuit Campground & Refugio Guide
- How to Backpack the O Circuit
- Gear List for Backpacking the O & W Trek
- W Trek Hiking Guide
- Best Day Hikes in Torres del Paine, Chile
- Backpacking through Patagonia for under $2,200