Backpacking the Upper Yosemite Falls Trail
Backpacking to the top of Yosemite Falls is quite a feat. Yosemite Falls is the tallest waterfall in North America and the 5th tallest in the entire world!
I have somewhat of a blind spot and soft spot to Yosemite Falls. This hike was my very first backpacking trip that I ever completed. I was in shape and so ready for the challenge! I was also so unprepared and couldn’t sleep at all because I was scared of noises in the night. But, I did it and I was hooked on backpacking!
In 2019, as a more experienced backpacker, I was looking for redemption on this trail, and brought my mom along for the ride. For context, I hiked the entire Pacific Crest Trail – 2,650 miles – in 2018, so I didn’t think this trail would test me. But wow, this trail really is difficult! I was gassed by the time I got to the top, and my mom made me promise to never bring her backpacking on this trail again.
Don’t let that scare you though. Hiking to the top of Yosemite Falls is really amazing, and I do think it is one of the best hikes in Yosemite. And I’m going to tell you everything I know about this trail to help make your trip a success! So keep reading to learn about permits, camping, water availability, and more!

Backcountry Emily contains affiliate links and I may receive compensation - at no extra cost to you! As an Amazon Associate I earn from qualifying purchases. See my Privacy Policy for more information.
Upper Yosemite Falls Hike Quick Facts & Stats
- Location: Yosemite Valley, Yosemite National Park
- Distance: 6.75 miles
- Elevation Gain/ Loss: 3,260 feet
- Difficulty: Hard
- Route Type: Out and Back
- Time to Complete: 2
- Best Time to Go: Spring – Fall
- Permits Required? Yes, $10 + $5/person
- Water Availability: Limited to the top of the falls
- Campsite Availability: Dispersed
- Pets allowed: No
- Trailhead Coordinates: 37°44’32.1″N 119°36’07.3″W
- Parking & Fees: $35 entrance to Yosemite. Park at Yosemite Falls Parking past the Lodge.
- Cell service: The three major US carriers (AT&T, T-Mobile & Verizon) all have some degree of service on this hike.
Try AllTrails+
Download offline maps, preview trails in 3D, access National Park guides and more! Use code “backcountryemily30” to get 30% off of AllTrails+.
Why Hike the Upper Yosemite Falls Trail
This is a hike worthy of a badge of honor. Being able to say you hiked to the top of the tallest waterfall in North America is pretty cool. Plus, you really earn the stunning views on this hike. Being able to witness the sun set on Half Dome and the Clark Range is worth the trip to the top!

Best Time to Hike the Yosemite Falls Trail
While this hike is technically available to hike and backpack year-round, spring and early summer are the best times to backpack this trail.
You do need to keep an eye on snowmelt for this hike, so check the Yosemite Wilderness Conditions page, but because this trail is south-facing, the winter snow will melt quicker here. Basically, once Glacier Point Road has been cleared and is open, Yosemite Falls is good-to-go in my book since they’re basically the same altitude.
I think early season is best for this hike because you get to experience the power of Yosemite Falls as you hike by it, and temperatures won’t be crazy hot yet like they get in the summer.
By the late summer – autumn, Yosemite Falls is barely flowing – it’s just the tiniest trickle unless a storm comes in and gives it some water.

Permits for Backpacking Yosemite Falls
Wilderness permits are required year-round for all backpacking trips in Yosemite. They’re released 24 weeks in advance via an online weekly lottery system. You can also try to get them one week in advance of your trip start date.
You’ll want to read my detailed permit guide about Yosemite’s permit system, and get your permits from recreation.gov.
There are actually two trailhead options for Upper Yosemite Falls. Yosemite Falls departs from Yosemite Valley, and Yosemite Creek is only accessible when Tioga Road is open. It’s a much longer and less scenic hike, but also has less elevation gain.
- Trailhead 1: Yosemite Falls
- Trailhead 2: Yosemite Creek
For the purposes of this post, I’m only going to discuss the Yosemite Falls trailhead, but just know that there is another option.
Your online permit reservation is only part of your permit. You need to visit a wilderness center in-person to pick-up and sign the real wilderness permit. The closest spot to do this is the Valley Wilderness Center next to the Ansel Adams Gallery.
Pro tip: Remember that your valid wilderness permit reservation allows you to enter Yosemite National Park if there are daily entry reservations enacted. You can enter the park one day before the date your permit begins. Make sure you have a screenshot of your reservation on your phone: there is no cell service at entrance gates.
Missed the permit window and really want to backpack this trail? Check out Outdoor Status to be notified instantly of permit cancellations!
Itinerary Options
Many people decide to extend this trip past one night by doing the full Snow Creek Loop and camping a second night near North Dome or the Snow Creek trail junction and returning to Yosemite Valley via the Snow Creek Trail.
This is the route that I planned for on my 2019 trip up the falls, but we saw that the snow still hadn’t melted between Yosemite Point and North Dome and decided to go back down the upper falls trail.

What You Need To Know Before Your Yosemite Falls Backpacking Trip
Weather
Yosemite is in the mountains. So, weather can really vary from warm and sunny to thunderstormy and even snowy! Generally this trail will be warm and sunny from May – September.
Afternoon thunderstorms are known to happen from July – early September, but they are not as regular as they are in the Rocky Mountains. Because this hike is pretty exposed, you should take precautions, especially if you are planning to visit one of the “points” on this trip like Eagle Peak or Yosemite Point. Get away from any metal like railings and your pack if it has a metal frame, try to find cover in a uniform stand of trees, and get into lightning position.
If you’re hiking this trail in the summer, keep in mind that this trail is very exposed past the first mile, so make sure you wear sun protective clothing and sunscreen and have plenty of water.

Water
There are no water sources on this trail until you get to Yosemite Creek above Yosemite Falls. The closest water fountain is in Camp 4 near the trailhead.
The park service recommends having 2 liters of water minimum to get to the top of the falls. I would bring 3 liters if temperatures are above 80°F.
You might also need to dry camp depending on where you camp, which means you need to carry enough water from a source to last you through the night and all of your cooking.
Camping Options Near Yosemite Falls
Wilderness campsites are mostly dispersed in Yosemite, so there aren’t designated spots. The rules for wilderness camping are 4 trail miles from Yosemite Valley and 1 air mile from any road, and at least 100 feet from any trail or water source.
On this hike in particular, your permit forbids you from camping at Yosemite Point, North Dome, or around the edge of Yosemite Falls, and requires that you camp 1/2 mile back from the rim of the valley.
Using the trailhead map from Yosemite, you can see that you need to camp past the arrows on the map.

It’s hard to gauge the 1/2 from the rim, and it’s actually probably closer than 1/2 mile, but your best bet for camping will be in the forest near the Eagle Peak trail junction, at a spot with a designated fire ring a little ways back from the footbridge over Yosemite Creek (you’ll see it when you keep hiking toward Yosemite Point), or on the ridge north of Yosemite Point.
This is one of those camping spots that I would just chat with a ranger about when you pick up your permit as they’ll be familiar with the area and can guide you. All of these spots will make your trip a little longer than what I’ve listed above by about 1-2 miles.
Campfires
Campfires are allowed on this trail since it’s below 9,600 feet. Remember that you are only allowed to have a fire in pre-made fire rings. You are not allowed to build your own fire rings or have a fire outside of a ring. If there are fire restrictions in place, the ranger will let you know when you pick up your permit. Fire restrictions preventing any kind of fire in the summer are very common in Yosemite.
Bears in Yosemite
Bears are definitely out and about on the Northern Rim! About 8 years ago the park service actually had to close an area to overnight backpacking near the Snow Creek Trail because a mother bear was teaching her cubs to break into bear canisters by dropping them off of cliffs. Crazy stuff!
Generally, bears in Yosemite won’t give you many problems. They’re black bears and you should give them space if you run into one on trail, and attempt to shoo them away if you see them close to your camp.
Always use your bear canister for storing food and toiletries in Yosemite! They’re required for backpacking and keep bears from becoming habituated to human food. On this hike, be sure to store your bear canister far from any cliff edge.
You might be thinking about bringing bear spray, but it’s actually illegal in Yosemite, and really isn’t necessary when dealing with black bears.
Elevation Gain & Difficulty
I just wanted to add a little section here about this. This is one of the most difficult trails in terms of grade (feet gained/mile) in the entire park. The switchback portions of trail gain over 1,000 ft/ mile, which is generally my baseline of “very hard”. Give yourself plenty of time to reach the top. I would estimate speed at 1 mile per hour with a weighted backpack, possibly slower if you are not in prime shape.
This trail is also nearly completely in the sun, which will wear you out faster than being in the trees. Take your time, drink plenty of water, and eat lots of salty snacks and electrolytes.

Leave No Trace
Remember that we are the stewards of public land! A Yosemite ranger will review all Leave No Trace guidelines with you when you pick up your permit, but be aware of them before starting your hike. There are 7 principles of Leave No Trace and they are important for maintaining this pristine park.
As a quick refresher, these are the 7 Leave No Trace Principles:
- Plan Ahead & Prepare
- Travel and Camp on Durable Surfaces
- Dispose of Waste Properly
- Leave What You Find
- Minimize Campfire Impacts
- Respect Wildlife
- Be Considerate of Others
Getting To the Upper Yosemite Falls Trailhead
The Yosemite Falls trailhead is located behind Camp 4 in Yosemite Valley, near shuttle stop 7.
Parking can be hard to come by in Yosemite Valley. This is the closest parking lot. But, you might have to park near Curry Village and take the free park shuttle over to stop 7.
Note that the Lower Yosemite Falls trailhead will not bring you to Upper Falls.

Where To Stay Before & After Your Hike
The most convenient place to stay before and after your backpacking trip is the Yosemite Valley backpacker’s campground in the back of the North Pines Campground. It costs $8/person/night. You don’t need to make a reservation, you just show up with your valid wilderness permit.
Make sure you have the recreation.gov phone app, because that is how you will pay, even if you don’t have service.
If you’re looking for a real bed before or after your hike, I’d recommend Curry Village or the Yosemite Valley Lodge, but those places sell out pretty quickly. Check out the map below for lodging options outside of the park.
Route Description & Itinerary for Upper Yosemite Falls
Day One: Yosemite Falls Trailhead to Beyond Yosemite Point
Day one Trail Info

The Upper Yosemite Falls trail starts at the back of the Camp 4 parking lot. The trail pretty much immediately begins climbing on a rocky path through an oak forest, before emerging from the forest on the side of the granite wall of the north rim of Yosemite Valley.
After a bit of flat trail that feels like a gift, the trail arrives at Columbia Rock. It’s a great viewpoint for Yosemite Valley, Half Dome, and North Dome. The vast majority of day hikers will turn around here after realizing that the rest of the uphill is steeper than what they just did!

After Columbia Rock the trail takes a bit of a break. Slightly downhill, flat, and shaded at times, it’s a really lovely reward from the first part of the climb. The views of Upper Yosemite Fall strongly flowing from the granite wall is pretty amazing. You can actually feel the power of the water as you walk by. And during the spring and early summer, you’ll probably get a little misted.
Next comes the doozy of switchbacks. After the view of the falls, you re-enter some trees and start rapidly climbing, before the trees fall away and it’s just you, rocks, switchbacks, and the sun beating down. Luckily on my trip, we actually got to this part later in the afternoon when there was shade after the sun moved away!


After the endless switchbacks, we finally got to the top of the falls and followed the trail away from the brink of the rim, crossing over Yosemite Creek on a footbridge. We continued hiking to Yosemite Point, enjoyed the view, and then continued hiking past the point up a ridge to find a spot to camp. This part of the hike is deceivingly difficult. It’s not nearly as steep as the trail we just hiked, but it still hurts after so much elevation gain!
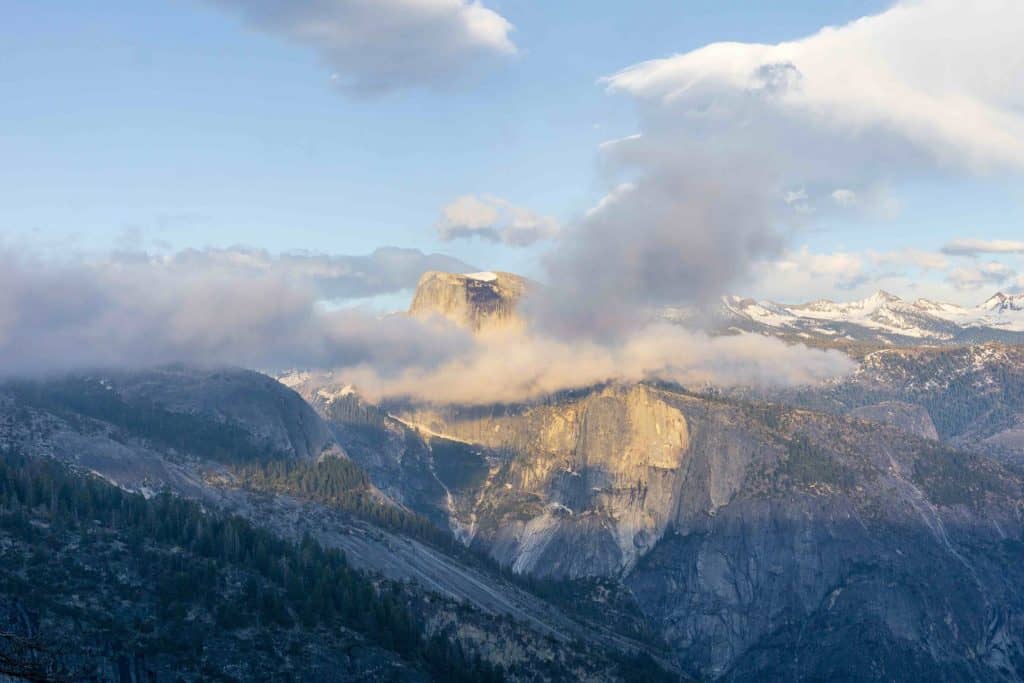
Something that surprised me was the amazing views of the Clark Range, a mountain range inside the park. The mountains are sloping and beautiful, and seeing them covered in late-season snow was such a treat. I watched the sunset in awe, even though I was initially disappointed in all of the clouds covering Half Dome.

Day Two: Beyond Yosemite Point to Upper Yosemite Falls Trailhead
Day Two Trail Info

The trail back to the trailhead is exactly opposite of the way up! Be aware of day hikers climbing as you are descending the switchbacks and remember that hikers going uphill have the right of way. Be sure to yield to them unless they want to take a break and invite you to pass them.
Personally, I love taking a break around the Columbia Rock area and soak up these views of Half Dome and the valley from above before going back into the trees and finishing the descent.
Gear Needed for Upper Yosemite Falls Camping
Gear can really make or break your backpacking trip, especially on a really steep and grueling hike like this one! I would focus on only bringing the absolute essentials with you on this trip. I’m a proponent of ultralight backpacking gear and think it shines on this trail. This is my lightweight backpacking gear guide you can read to see what I bring on nearly every trip.
There are a few pieces of gear that you’ll definitely want to consider bringing.
- Trekking poles. With so much steep elevation gain and loss on this hike, your knees will thank you for taking some pressure off!
- A bear canister. You can rent one for a small deposit in Yosemite Valley, but I find it easier to have my own and pack it at home. With so many places requiring them now, you might consider having your own. Plus, this one is much lighter than the rental one at the park.
- Water filter. You always want to filter backcountry water! No reason to get Giardia or crypto.


Final Thoughts
Backpacking the Upper Yosemite Falls trail is quite a physical challenge, but I’d say it’s worth it as long as you are in shape! The views of Half Dome and the Clark Range are beyond stunning, and once you get away from the crowds of the main trail, you won’t believe the views you get all to yourself.
While camping is limited in the area and can be hard to find, I’d recommend chatting with the wilderness rangers when you pick up your permit to see if they have spots they’d recommend camping in. And don’t forget – this trail is great for continuing on to Eagle Peak, El Capitan, North Dome, and beyond!
Have any questions, comments, or memories about the Yosemite Falls trail that you’d like to share? Let me know in the comments below!

Pin For Later

