Backpacking to Upper Cathedral Lake: A Complete Guide
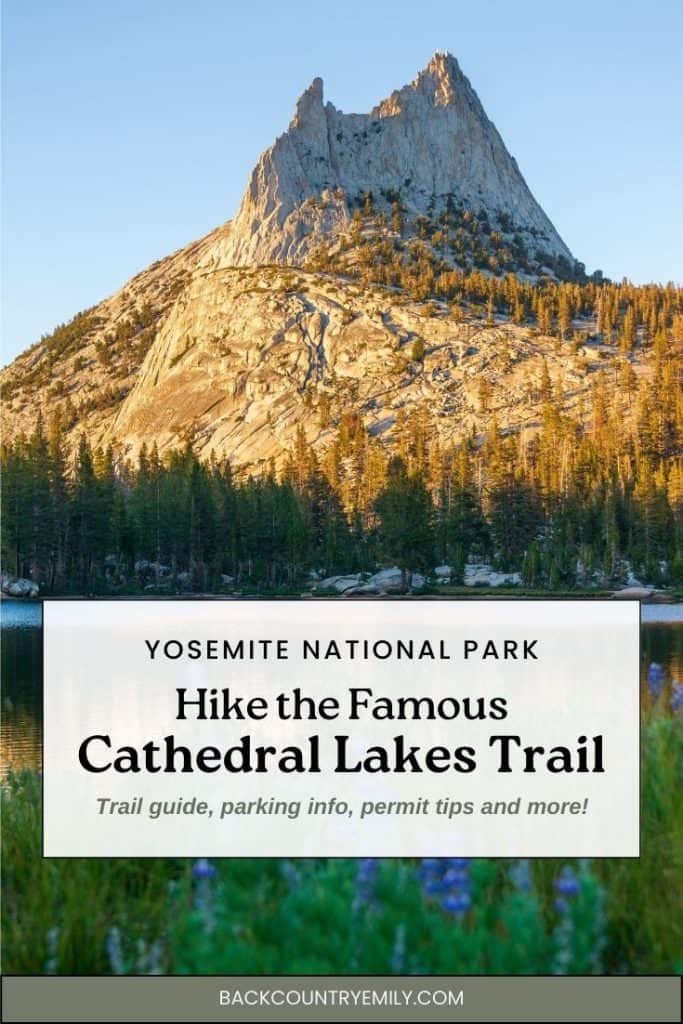
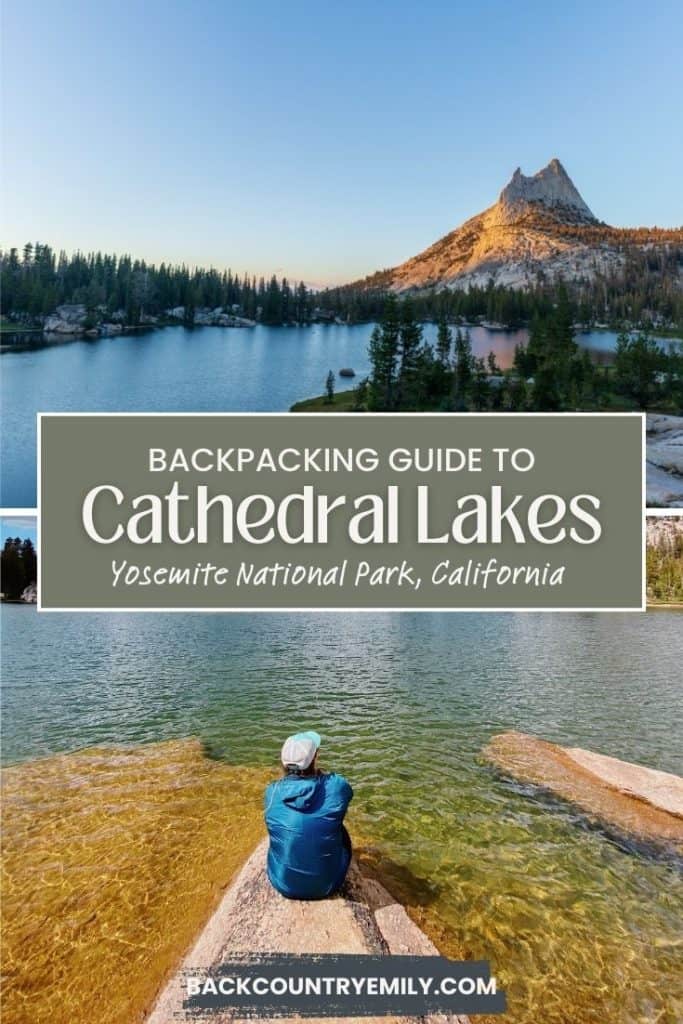
Cathedral Lakes is one of the most gorgeous backcountry lakes in Yosemite. It’s also probably the most well-known part of the National Park that is not located in Yosemite Valley! I’ve had the pleasure of backpacking and camping at Upper Cathedral Lake twice, and I guarantee you: it is worth every mile.
This crystal-clear lake is so stunning, easy to swim in, and the views of Cathedral Peak are out of this world. Plus, there’s lots of off-trail exploring you can do in the rock slabs facing the lake. And the best news of all? This hike is one of the most beginner-friendly backpacking trips in Yosemite. The well-marked trail, gentle elevation gain, and breathtaking scenery make this the perfect intro to backpacking.
In this trip report I’m going to go over important things you need to know about backpacking to Cathedral Lakes: how to get permits, important rules, the best campsites, and my top tips for an unforgettable trip to Cathedral Lakes.

Backcountry Emily contains affiliate links and I may receive compensation - at no extra cost to you! As an Amazon Associate I earn from qualifying purchases. See my Privacy Policy for more information.
Upper Cathedral Lake Quick Facts & Stats
So quick head’s up: There are two lakes here. Lower Cathedral Lake and Upper Cathedral Lake. I’m sure the lower lake is very lovely, but I highly recommend going past it and continuing to Upper Cathedral Lake if you want to camp. You’ll have a much better view of the iconic Cathedral Peak. Also, you’ll be hiking a portion of the John Muir Trail to get to the lakes! Pretty cool, right?!
- Location: Tuolumne Meadows, Yosemite National Park
- Distance: 8 miles
- Elevation Gain/ Loss: 1,530 feet
- Difficulty: Moderate
- Route Type: Out & Back
- Time to Complete: 2
- Best Time to Go: Summer – early Fall
- Permits Required? Yes, $10 + $5/person
- Water Availability: Limited
- Campsite Availability: Dispersed
- Pets allowed: No
- Trailhead Coordinates: 37°52’23.8″N 119°22’57.4″W
- Trailhead Toilet: Yes
- Parking & Fees: $35 park entry. Park on the side of the road or at the Tuolumne Meadows Visitor Center if street parking is full.
- Cell service: No

Try AllTrails+
Download offline maps, preview trails in 3D, access National Park guides and more! Use code “backcountryemily30” to get 30% off of AllTrails+.
Best Time to Hike the Cathedral Lakes Trail
Cathedral Lakes is located in the Tuolumne Meadows area of Yosemite at an elevation of 9,600 feet above sea level. This area is not accessible by car during the winter.
Tioga road, where the trailhead for Cathedral Lakes is located, closes to overnight parking on October 15th each year. It usually re-opens sometime between Memorial Day and the end of June, depending on how much snow fell over the winter and how much damage was done to the roads and structures in the area. In some heavy snow years, the road hasn’t opened until after the 4th of July! Sadly, if you reserve a permit for a date before Tioga Road opens, you will not be able to use your permit, and you will not be given an option to reschedule. You can view the chart of historical open/ close dates of Tioga Road here.
With all that said, the best time to backpack this trail is from mid-July until October 14th. Be aware though – the nights will be very cold after mid-September, so be sure you’re prepared for snow and freezing temperatures fi you decide to hike this late in the season!

Permits for Camping at Upper Cathedral Lake in Yosemite
Wilderness permits are required for all overnight backpacking trips in Yosemite National Park. As I said earlier, this hike is really awesome for beginners and also has one of the most beautiful and well-known views in the park. So, overnight permits to camp here are limited and competitive.
60% of overnight permit reservations are released 24 weeks in advance via an online weekly lottery system. The remaining 40% of reservations are available one week in advance of your trip start date.
My guide on how to get a Yosemite wilderness permit goes into all the details of Yosemite’s permit system, so be sure to read it and then get your permits from recreation.gov.
When you get to the park, you’ll want to pick up your wilderness permit at the Tuolumne Meadows Wilderness Center. If you’re coming from the western CA-120 entrance (Big Oak Flat), you can also pick up your permit at the Big Oak Flat Information Center on your way into the park. I usually do this when I’m backpacking on Tioga Road because it’s a great spot to stretch the legs, use the bathroom, throw away any car snack trash, and pick up my permit before finishing the drive to the trailhead.
Pro tip: Remember that your valid wilderness permit reservation allows you to enter Yosemite National Park if there are daily entry reservations in place. You can enter the park one day before the date your permit begins. Make sure you have a screenshot of your reservation on your phone: there is no cell service at entrance gates.
Missed the permit window and really want to backpack this trail? Check out Outdoor Status to be notified instantly of permit cancellations!
What You Need To Know To Backpack To Cathedral Lakes
Weather
Summer is thunderstorm season in Yosemite’s high country. You should be ready for thunderstorms if you’re backpacking from July – September. In my experience, they aren’t as regular as the thunderstorms in the Rockies, but I’ve experienced a thunderstorm at Cathedral Lake before, and I’ve watched dark storm clouds gather above Cathedral Peak. So both of my trips here I’ve seen this stormy activity!
There is no safe place outside in a thunderstorm, but if it does happen, get away from metal, get out of the water, descend from the rocky ridges, and find an open, low space on solid ground. Assume lightning position as a last resort.
The daily weather in the high country in the summer is generally warm and sunny during the day, with cool temperatures overnight. But summer heat can be a doozy in Yosemite, even in the high country. This trail is a mix of forested and exposed. Where the trail is more forested, the trees aren’t very thick, so you should still make sure you are wearing UPF protected clothing and/or SPF sunscreen!
Since Upper Cathedral Lake is at 9,600 ft in elevation, nights can be cold, even in the middle of the summer! A sleep system rated down to 20° F is usually sufficient for most summer backpacking in the Sierra. Make sure to bring an insulated puffy jacket too! Don’t be surprised to find ice on your tent in the morning once September rolls around.

Water
The trail crosses paths with one stream between the trailhead and Upper Cathedral Lake at mile 1.5. I don’t really see the need to rely on this water source since it’s only a 4 mile hike to the lake. Starting your hike with 2 liters of water should be sufficient to get you to the lake, where you have lots of water.
That being said, the lake is probably going to be your main water source. The inlet for the lake is hard to reach from campsites, and the outlet is on the trail approach side, away from the camping area. So make sure you are filtering this lake water!
Camping Options
The best camping at Upper Cathedral Lake is on the south side of the lake, away from Cathedral Peak. You’ll want to hike on the trail past the lake, and on your right, you’ll see a faint use trail that takes you to the southern shore of the lake. There are a few sandy campsites among the trees, which are really lovely, flat places to pitch your tent with very easy access to water.
However, if you’d like to get away from crowds a little more, you can start hiking up the ridge from the lakeshore and find a flat spot higher up. You’ll have an amazing view of the lake, Cathedral Peak, and the distant mountains in northern Yosemite. Just be aware that you’ll need to hike a ways down to the lake to collect water, and the ground up here is solid rock, so you’ll have a hard time staking down your tent.
There is also camping on the northern side of the lake in the trees if you’d like more protection.


Altitude
This trail starts at 8,500 feet above sea level, which is high enough for some people to begin feeling the effects of altitude sickness. I will say, I’ve driven from San Francisco at sea level up to Tuolumne Meadows and hiked to Cathedral Lakes in one day. And I definitely was feeling the effects of altitude just because it was a lot for my body to handle in 24 hours! I usually can tell after driving to Tuolumne that I’m at a higher altitude, especially if I didn’t drink enough water during the drive.
To best prepare for hiking at altitude, my recommendations are to try to arrive a day before your hike so your body can acclimate, drink lots of water on your travel days leading up to the hike, and drink lots of water and eat salty snacks while hiking. The only cure for altitude sickness is to descend.
Bears
Bears are prevalent and active in Yosemite National Park and you must use an approved bear canister for storing all of your food and scented items. There is no other approved backcountry food storage method in the park.
Yosemite does rent bear canisters to those who don’t own one of their own. Learn more about canister rentals here.
The ranger should inform you of this when you pick up your permit, but Yosemite recommends keeping your bear canister within 50 feet of your campsite so you can hear if a bear is sniffing around or trying to get inside of the canister in the middle of the night. They ask that you attempt to shoo the bear off to help keep bears afraid of humans and the consequences of messing around with canisters.
My favorite bear canister is the BV450 – perfect for solo outings up to 4-5 days long!
Bear spray is illegal in Yosemite. Black bears are generally pretty skittish and just want your food, so you shouldn’t really need it. Just get big and get loud and they’ll run away.
Bugs
Bugs can be pretty bad on this trail. The hike initially starts in a meadowy forest area, which is teeming with mosquitoes in the early season, and gnats like to hang out there later in the summer as well. I would definitely treat your clothes with permethrin before this trip and be sure to bring bug spray. You’ll probably encounter the worst of the bugs in July.
Navigation
The trail to Cathedral Lakes is one-in-the same as the famous John Muir Trail, so the path is very well worn and the signage is very easy to understand. You should have no issues navigating on this trail, but I still always recommend downloading offline maps on an app like AllTrails or GaiaGPS and having a paper backup in case something happens to your phone!

Campfires
Campfires are prohibited in the Cathedral Lakes basin.
Leave No Trace
The Cathedral Lakes area is really stunning, but is also fragile and susceptible to people not following Leave No Trace.
Cathedral Lakes directly flows into the Tuolumne River, which is a water source for San Francisco. So extra guidelines need to be in place here, like washing dishes and peeing and pooping more than 300 feet from the lake and streams in the area.
Swimming is also really popular in these lakes, and you should enjoy this! But that also means you need to wash off your sunscreen (yes, even mineral) and bug spray before getting into the lake, and do that 300 feet from the lake. Remember: you’re filtering water from this lake. Kinda gross to think about filtering bug spray water, right?!
Remember that we are the stewards of public land! A Yosemite ranger will review all Leave No Trace guidelines with you when you pick up your permit, but be aware of them before starting your hike. There are 7 principles of Leave No Trace and they are important for maintaining this pristine park.
As a quick refresher, these are the 7 Leave No Trace Principles:
- Plan Ahead & Prepare
- Travel and Camp on Durable Surfaces
- Dispose of Waste Properly
- Leave What You Find
- Minimize Campfire Impacts
- Respect Wildlife
- Be Considerate of Others

Transportation & Parking at Cathedral Lakes Trailhead
The Cathedral Lakes trailhead is on Tioga Road. The easiest way to get here is to drive yourself. You’ll either enter the park from CA-120 in the west or CA-120 at the eastern Tioga Pass entrance, coming from Highway 395.
Remember that you have to pay the entrance fee of $35 per car for entry into Yosemite. I prefer to use the America the Beautiful Pass – it’s $80 for a full year of access to national parks, monuments, forests, and BLM land!
You are able to take public transportation via YARTS to the Tuolumne Meadows Visitor Center from Yosemite Valley, Mammoth Lakes, June Lake, and Lee Vining. Just a note: you might have to walk more if you’re doing this since you need to pick up your wilderness permit at the wilderness center, which is about 2 trail miles from the Cathedral Lakes trailhead. Learn more about YARTS here.
There is no designated parking lot for this trailhead, and the roadside parking is limited. You can park at the Tuolumne Meadows Visitor Center, which is a short walk away from the trailhead, or park at the Wilderness Center, which is a bit of a longer walk – it will add about 4 miles round-trip to your hike.
There is a twice-daily hiker shuttle that runs in Yosemite during the summer season between Yosemite Valley and the trailheads along Tioga Road. It does cost money and it is run by the concessionaire. You can learn more about that bus here.

Where To Stay Before & After Your Hike
Yosemite operates backpacker’s campgrounds in a few locations specifically for backpackers to have a place to stay the night before and after their wilderness trip. It costs $8/person/night. There is a backpacker’s campground in the Tuolumne Meadows Campground, super close to the Cathedral Lakes trailhead. It’s about 1 more mile of walking.
The Tuolumne Meadows Campground has been closed for renovations, and we don’t know if it will open in 2025 yet. Learn more about that here.
If you’re looking to sleep in a bed after your hike, the Tuolumne Meadows Lodge is an option for rustic tent cabin sleeping. Otherwise, Lee Vining is the closest town with lodging and food, but Mammoth Lakes will have more variety. Wherever you stay, you must visit the Mobil Mart and get a nice big meal after your trip. It’s one of my all-time favorite places to eat on Highway 395!
Check out the interactive map below to find what works best for you!
Cathedral Lakes Trail Itinerary & Trip Report
Day One: Cathedral Lakes Trailhead to Upper Cathedral Lake
Day one Trail Info

The trail begins at the trailhead on Tioga Road. You’ll take once last look at Tuolumne Meadows behind you before walking down the sandy path into the forest.
I hate to say this, but the trail is not very exciting. You’ll start climbing immediately, gaining a little over 500 feet in one mile, before the trail mellows out for a bit and you enjoy a little bit of alpine meadow. You might see some wildflowers in mid summer or deer or marmots wandering around in this area. You’ll also have views of the granite ridge that turns into Cathedral Peak.
Enjoy this little bit of flat though because the next bit of trail is steeper than the first. It can be rocky and uneven at times, so watch your footing. The trail steadily switchbacks up the mountain, gaining another 500 feet in about a mile. Again, this part of the trail is in the forest without many views.
But once you reach the top of this second climb, the trees thin out a bit and the scenery changes more. You’re on a granite rise, with sparse trees and really feel like you’ve made it to the high country. On my first trip to Cathedral Lake this is where I heard thunder rumbling. Not the best place to be when you hear thunder!! I quickly descended toward the lake.
Soon, you’ll pass the turn off to Lower Cathedral Lake. It is a half mile to the lakeshore from this point. But, I’d recommend you keep hiking to Upper Cathedral Lake, which is now only a little over a half mile away! If you want to visit the lower lake, make a detour on your hike back to the trailhead.
You’ll see Upper Cathedral Lake from the trail in the forest and might be tempted to break away here, but keep hiking south on the John Muir Trail until the forest thins again and you’re out in the open meadow. Here you should see the faint use trail to your right through the lakeside meadow and end up on the southern shore where all the best campsites are.

Day Two: Upper Cathedral Lake to Trailhead
Day Two Trail Info

To get back to the trailhead, follow the way you came in! If you’d like to see the view from the photo above, hike a little less than a mile south on the JMT until Cathedral Pass and you can get these views of the northern mountains with Cathedral Lake below!
On the hike out is the perfect time to stop at Lower Cathedral Lake. If you want views of Cathedral Peak from this lake, you’ll need to hike to the western side of the lake, which will add a little more than a mile total to your day.

What Gear You Need To Pack
Gear can really make or break your backpacking trip! I’m a proponent of ultralight backpacking gear and think it shines on this trail. This is my lightweight backpacking gear guide you can read to see what I bring on nearly every trip.
There are a few pieces of gear that you’ll definitely want to consider bringing.
- A freestanding tent. If you’re planning to pitch your tent on the granite slabs well above the lake, you’ll probably want a tent that stands up a little easier and doesn’t require lots of staking down. Don’t leave the rain fly at home!
- A bear canister. You can rent one for a small deposit in Yosemite Valley, but I find it easier to have my own and pack it at home. With so many places requiring them now, you might consider having your own. Plus, this one is much lighter than the rental one at the park.
- Water filter. You always want to filter backcountry water! No reason to get Giardia or crypto.
- Pack towel. If you’re planning to swim, you might want a small towel to easily dry yourself.
- A puffy jacket. You might be backpacking this trail in the summer, but nights at nearly 10,000 feet above sea level get cold quickly!
Final Thoughts
Backpacking to Cathedral Lake is definitely worthy of a spot on your Yosemite bucket list. It’s one of the best lakes I’ve ever backpacked to and the views at the lake are awe-inspiring. There’s a reason I’ve camped there twice already and still crave going back. It’s a magical spot that both advanced and beginner backpackers will love visiting.
Remember to get permits ahead of time and leave the wilderness better than you found it.
Have any questions, comments, or memories about the Cathedral Lakes Trail that you’d like to share? Let me know in the comments below!
Pin For Later