How To Thru-Hike the High Sierra Trail in Sequoia National Park
If you’re craving an epic thru-hiking adventure but can’t take months or even weeks off work, the High Sierra Trail (HST) in Sequoia National Park is the perfect solution.
The HST stretches 72 miles east to west across Sequoia, traveling from sequoia trees at crescent Meadow, over the Great Western Divide, and ending at the top of the tallest mountain in the contiguous USA – Mt. Whitney!
The High Sierra Trail is the best short thru-hike. And it’s a great alternative to the John Muir Trail because it’s challenging, but also easily doable with only a week’s time. It’s perfect for those with limited PTO and wanting to get a taste of what thru-hiking is all about!
I hiked the HST with my mom in August 2019, fresh off of a PCT thru-hike in 2018 and having hiked another short thru-hike – the Wonderland Trail – earlier in the summer. We had such a great time and it gave my mom the thru-hiking bug: we decided to hike the John Muir Trail the next summer together!
In this guide, I’m going to go over everything you need to know about planning this thru-hike. I’m going to talk about getting permits, the logistics of transportation, camping information and itinerary recommendations, and more!
Backcountry Emily contains affiliate links and I may receive compensation - at no extra cost to you! As an Amazon Associate I earn from qualifying purchases. See my Privacy Policy for more information.
High Sierra TRAIL STATS

HST Quick Facts & Route Description
The High Sierra Trail is a trail that travels east-west through Sequoia National Park. The actual trail is technically 61 miles because it ends at the top of Mt. Whitney, but you’ll usually hear it described at 72 miles since you need to hike out to Whitney Portal, the nearest trailhead.
There are 2 trailheads for the trail. One at Crescent Meadows in Sequoia National Park on the west side, and the other is Whitney Portal in Inyo National Forest in the east.
The trail traverses gorgeous High Sierra terrain and features some really cool trail features like bridges over ravines, blasted tunnels through granite, huge glacier-carved meadows, hot springs, glistening alpine lakes and more.
It’s pretty amazing how much diversity in terrain you get to experience in such a short hike – which is why it is so popular and loved.

Best Spots on the High Sierra Trail
These were some of my favorite places on the High Sierra Trail, and places you should definitely try to spend a little bit of time at on your hike. I’ll always remember crying once I reached Kaweah Gap. I’d done hard climbs before, but wow, the culmination of that beautiful climb and the endless view from the gap was incredible. Best snack break ever.
- Hamilton Lake
- Precipice Lake
- Kaweah Gap
- Big Arroyo
- Moraine Lake (technically on an alternate)
- Kern Hot Springs
- Guitar Lake
- Mt. Whitney
Try AllTrails+
Download offline maps, preview trails in 3D, access National Park guides and more! Use code “backcountryemily30” to get 30% off of AllTrails+.
How To Get High Sierra Trail Permits
Permits are required to backpack overnight in Sequoia National Park. The permit quota season exact dates vary year to year.
In 2025, the permit number is limited from May 23rd – September 27th. Before or after these dates you are able to visit a visitor center and get a permit without competition.
Advance Reservations
Eastbound: Crescent Meadows Trailhead Start
Sequoia – Kings Canyon National Park jointly manages wilderness permits since these parks are right next to each other. Permit reservations cost $15 + $5/person.
Advance permit reservations are released 6 months in advance to the day. For example, if you want to start your trip on August 10th, you need to reserve your permit on February 10th.
Permits are released exactly at 7:00 am Pacific Time on recreation.gov. You’ll want to be on the computer and ready to refresh your browser before that time to have the best chance of getting a permit.
You have 15 minutes to fill out your permit and estimated campsites for your itinerary.
Pro Tips:
- Entry trailhead is “High Sierra Trail”
- Make sure your exit trailhead is Mt. Whitney (Trail Crest Exit)
- You are able to go back to your permit and edit campsites and your exit date (but not your entry date)
- This is not set in stone. You’re allowed to camp other places and no one is going to yell at you or ticket you for not sticking to your itinerary to a T.
This is what the screen will look like. I entered in my itinerary on the campsite lines for you so you could copy this.

Once you have your permit reservation, you need to visit the ranger station to pick up your actual permit before you begin your hike.
You can do that the day before your hike at a wilderness center during open hours beginning at 1:00 pm, and until 10:00 am the day of your hike. Make sure you read all the details & rules for picking up your permit. You must pick up your permit for the HST at the Lodgepole Visitor Center.
Westbound: Whitney Portal Trailhead Start
You must enter the Mt. Whitney Lottery in order to begin a backpacking trip at Whitney Portal in Inyo National Forest.
If you fail to secure a date in the lottery, be sure to check when the unclaimed permits are released each year. All of the information for Mt. Whitney can be found on the recreation.gov website.
Permit Cancellations
Sometimes people cancel their permits. So checking the available permits on recreation.gov is a great option, especially if you’re flexible with when you hike.
Another option is to use a resource like Outdoor Status, which is an availability tracker and will text you immediately once a permit is cancelled. You can view the availability calendar below!
Walk-Up Permits
A portion of permits are available as in-person walk-ups. You’ll need to be at the Lodgepole Visitor Center the day before you want to start hiking at 1:00 pm in order to get a walk-up.
Since most people find walk-ups for a long trip like this a little nerve-wrecking and usually won’t want to “risk it”, you actually have a very good chance of getting a walk-up permit for the HST. Your only competition is people who just want to go out to Hamilton or Precipice Lakes, which to be fair, can be a good handful of people.

Itinerary Planning for the High Sierra Trail
Travel Direction
Most people attempting the HST will hike eastbound, from Crescent Meadow to Mt. Whitney, and I think it is the best option for most people, for the following reasons:
1. Permits
It is much harder to obtain a permit beginning at Whitney Portal than at Crescent Meadow. Even though your itinerary is taking you out of the Whitney Zone, you are still going to be lumped in with the backpackers wanting to only do Mt. Whitney. There are more hikers vying for an overnight Whitney permit than for a permit beginning at Crescent Meadow.
2. Acclimatization
Crescent Meadow sits at 6,500 ft above sea level and Whitney Portal is at 8,300 ft, almost 2,000 ft. higher. When you start at Crescent Meadow, you will probably not go above 8,000 ft on your first day, whereas if you start at Mt. Whitney, you are either aiming for a summit on your first day (14,505 ft) or at least to Trail Camp (~12,000 ft).
Anyone can fall victim to Acute Mountain Sickness (AMS), even the most experienced mountain adventurers. If you start at Crescent Meadow, you’ll have plenty of time to get used to the higher elevations.
3. Ease of Hike
Maybe more subjective, but I think it is easier to do Mt. Whitney without a pack full of a week’s worth of food and gear. But if you enjoy a physical challenge, by all means, go for it!
4. “Grand Finale” Aspect
This is a little more nostalgic, but ending on Mt. Whitney is much more grand than ending at a parking lot! Of course, you’re really ending your hike at Whitney Portal, which is a parking lot, but I think having the Mt. Whitney summit as something to look forward to your whole hike is motivating!

Best Places to Camp on the HST
On the High Sierra Trail, you will have the ability to disperse camp, or camp anywhere you’d like, as long as you abide by Leave No Trace principles: camp at least 200 ft (the minimum in SEKI is actually 100 ft) from trails and water, and don’t build new fire rings.
In reality, most HST hikers are camping at the designated campsites along the trail since they just make sense and usually have a great point of interest nearby. There are also some places that you literally cannot camp – like anywhere between Hamilton and Precipice Lake or most places along the Kern River.
These were my favorite camping areas on the High Sierra Trail:
- Hamilton Lake
- Moraine Lake
- Guitar Lake
LIST OF DESIGNATED CAMPSITES ALONG THE HST WITH A BEAR BOX (NPS MILEAGES):
There are some campsites in the backcountry that have permanent bear boxes in place, which helps with food storage in case you have a small canister or don’t have one at all.
You could plan your whole hike around just camping at these locations, though your Mt. Whitney day would be very, very long since you’d have to go from Crabtree Meadow, summit Whitney, then exit Whitney Portal since bear canisters are required in the Whitney Zone.
- Mehrten Creek – 5.8 miles
- Nine Mile Creek – 8.8 miles
- Buck Creek – 10 miles
- Bearpaw Camp – 11.2 miles
- Upper Hamilton Lake – 15.3 miles
- Big Arroyo – 23.3 miles
- Moraine Lake – 30 miles
- Kern Hot Springs – 37 miles
- Junction Meadow – 45 miles
- Wallace Creek – 49.5 miles
- Crabtree Meadow – 54 miles
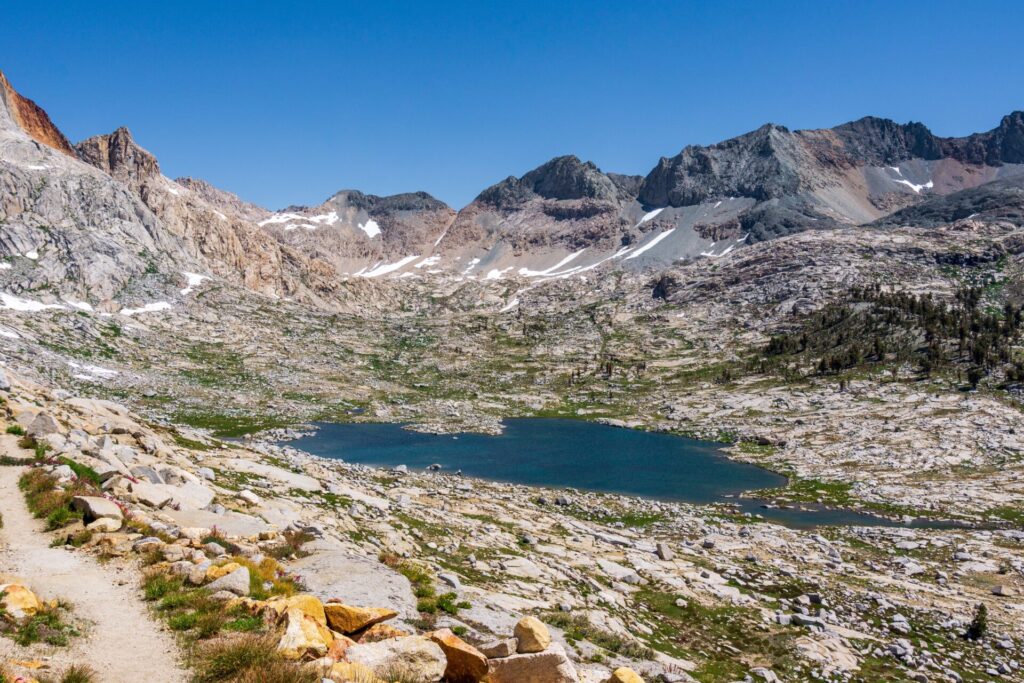
Moraine Lake Alternate Route
I haven’t heard of too many people skipping Moraine Lake on the HST, even though its not on the HST. I’m sure the hike on the Chagoopa Plateau is nice, and it is about 0.25 miles shorter, but Moraine Lake is just so dang beautiful! And the camping at the lake is really great (though, definitely buggy in prime mosquito season).
So, I have no reason to promote skipping the real HST, because I didn’t do it, but I’d highly recommend doing the detour to Moraine Lake. If this picture doesn’t convince you, then I’m not sure what will.

My 7 Day High Sierra Trail Itinerary
I thought 7 days was the perfect amount of time to hike the HST. I got to camp at some really pretty places and didn’t feel like I needed to rush through the day.
I also liked taking a mid-day break at Kern Hot Springs vs. camping there, even though the Junction Meadow camp area wasn’t that great.
- Day 1 – Crescent Meadow to Buck Creek: 9.25 miles, +3,000 & -2,500 ft
- Day 2 – Buck Creek to Hamilton Lakes: 4.7 miles, +2,500 & -1,500 ft
- Day 3 – Hamilton Lakes to Moraine Lake: 12.7 miles, +3,900 & -2,900 ft
- Day 4 – Moraine Lake to Junction Meadow: 13.8 miles, +1,600 & -2,800 ft
- Day 5 – Junction Meadow to Guitar Lake: 10.7 miles, +4,400 & -1,000 ft
- Day 6 – Guitar Lake to Trail Camp: 8.4 miles, +3,500 & -3,000 ft
- Day 7 – Trail Camp to Whitney Portal: 5.9 miles, +250 & -3,900 ft

Sample 5 Day HST Itinerary (Faster)
Want to hike a little faster on this trail? This is the itinerary I’d recommend with camping at some of the more beautiful spots on the trail.
- Day 1: Crescent Meadow – Hamilton Lakes
- Day 2: Hamilton Lakes – Moraine Lake
- Day 3: Moraine Lake – Wallace Creek
- Day 4: Wallace Creek – Tarn above Guitar Lake (OR, bivy/ cowboy camp at sites just below the Trail Crest junction on west side of mountain)
- Day 5: Tarn Above Guitar Lake – Whitney Portal
Sample 9 Day HST Itinerary (Slower)
In case you’d like to take your time on the trail and camp at all of the amazing places, this is the itinerary I’d suggest. It has you mainly camping at places with bear boxes since I’m pretty sure you won’t be able to fit 9 days of food into your bear canister.
- Day 1: Crescent Meadow – Nine Mile Creek
- Day 2: Nine Mile Creek – Hamilton Lakes
- Day 3: Hamilton Lakes – Big Arroyo
- Day 4: Big Arroyo – Moraine Lake
- Day 5: Moraine Lake – Kern Hot Springs
- Day 6: Kern Hot Springs – Wallace Creek
- Day 7: Wallace Creek – Guitar Lake
- Day 8: Guitar Lake – Trail Camp/ Outpost Camp
- Day 9: Trail/ Outpost Camp – Whitney Portal

When to Backpack the HST
In general, the best months to backpack the High Sierra Trail are July – September. But it really will depend on how much snow fell in the mountains during the winter, and how warm the spring was.
I highly recommend following the park’s wilderness conditions page throughout the spring and summer to give you an idea of the current trail conditions while you’re prepping for your hike.
May
Not accessible unless there is a super low snow year and high temperatures, or you are expecting to ski/mountaineer the trail.
Some years (low snow), Memorial Day weekend can be an ok time to start, so long as you are prepared for snow on passes and a winter Whitney summit (crampons & ice axe).

June
Depends on the snowfall and spring temperatures. Even with a lower snow year, you can expect to have snow on the northern side of passes, and will most likely have snow on Mt. Whitney.
In a normal snow year, microspikes and an ice axe may or may not be required. If you decide to bring an ice axe, should know how to use it for self-arrest before hiking.
If it is a low snow year, the end of June will have almost no snow on the trail. Mosquitos will be out in full force by the end of the month. Weather is generally good: warm days and cool nights.
Creek crossings will be high, proper creek crossing technique is necessary. Meadows and trails will be muddy: must be willing to stay on trail and not create “braided trails” to keep feet dry.
Expect lakes to still have ice in them.
July
In a normal snow year, the trail will be mostly clear of snow, but may have some lingering snow around Precipice Lake & Kaweah Gap and near Guitar Lake/ Whitney.
Streams will be running well, sometimes overflowing on the trail, and can have some difficult crossings. Feet will be wet. Meadows and trails will be muddy: must be willing to stay on trail and not create “braided trails” to keep feet dry.
Mosquitos will be heavy. Wildflowers will be present, meadows will have green grass. Warm days and warm nights, with day & nighttime temps colder in the Whitney Zone.
Afternoon thunderstorms are possible.
August
We hiked at the end of August during a high snow year, and the same year that part of the trail above Hamilton Lake fell away. We experienced mostly dry trail – the only spot with snow was in the rocks near Precipice Lake that we had to scramble around. Mt. Whitney was not an issue, though it was cold at the summit!
Clear trails, lower creek crossings with many rock-hoppable crossings. Possible to have dry feet the majority of the hike.
Mosquitos are dying down, as are wildflowers. Days are hot, especially at lower elevations (can easily see 90* F days), and nights are warm.
Nights will start cooling off towards the very end of August. Day & nighttime temps colder in the Whitney Zone.
Afternoon thunderstorms are possible. Wildfire smoke and wildfires can be a concern.

September
Snow-free trails, low creek crossings. Some small streams have dried up.
Possibility of a snow storm, usually mid-late September, but usually not big enough to end hiking season. Cooler days and nights, nights will get below-freezing. More possibility for ice on trail from overnight freezing. The Whitney Zone has cooler temperatures than the rest of the trail.
Mosquitos are gone, but so are wildflowers & meadows are not very green anymore. Less crowds.
Thunderstorms are still possible in the afternoon. Wildfire smoke and wildfires can be a concern.
October
A good backpacking month for those who are prepared. Winter storms could come at any time, but overall, October is a pretty pleasant month, and you could do a successful HST hike.
Temperatures will be much cooler than September, but the days are sunny. The Whitney Zone will be very cold, with below-freezing days and nights.
It is worth re-iterating: a large snowstorm could end your hike at any time. Know bail-out points (not many on the HST) and be prepared for cold temperatures.
Wildfire smoke and wildfires can be a concern, but generally less so than September.
Getting to the High Sierra Trail & Transportation Logistics
The most daunting part of planning a HST hike is the transportation to/from the trailheads. The HST crosses the Sierra Nevada, and the Southern Sierra is known for not having any roads bisecting the range.
In fact, it takes over 5 hours to drive from the Giant Forest to Whitney Portal by way of Mojave and Tehachapi Pass.

It is possible to plan, you just have to be flexible, and understand there are no fast or easy ways to get between the trailheads.
For flights, you’ll have the most luck flying into Fresno, CA (FAT) or Reno, NV (RNO). Both of these locations work better for taking public transportation and reservable shuttle options vs. flying into larger airports like SFO or LAX and needing to rent a car.
1. A Willing Friend/ Family Member
This is the best option for you, and the worst option for the poor soul you’ve suckered into driving long distances to shuttle you around.
My mom and I convinced my dad that it would be lots of fun to drive from San Francisco, camp at Lodgepole Campground, very close to the beginning of the trail, and then for him to drive to Whitney Portal to pick us up at the end of our hike, a week later. He will give his own dramatic retelling of his long road trips, but this worked out very well for us.
2. Two Shuttle Cars
This is the next most convenient option if you are hiking with a small group. You’ll all drive together to your ending trailhead, drop off one of the cars, and then all drive together in the remaining car to the starting trailhead.
If you are leaving a car at Whitney Portal, it must be cleared of ALL scented items. You can’t leave food, sunscreen, chapstick, lotion, baby wipes, etc. in your car at the Portal. Bears here will attempt to break into your car, and they can do serious damage.
You could also consider not driving all the way into Sequoia National Park & leave your car in the town of Visalia for a few reasons:
- It’s a long drive on a windy road into the park.
- You’re probably going to be tired from all the driving and you probably need a place to stay the night before your hike since the car shuttling is going to take all day.
- When you finish your hike and have to drive back to the western side, it’ll be shorter to drive to Visalia to pick up your car vs. all the way back into the park.
From Visalia, you can take a paid shuttle into the park, then utilize the park’s free shuttle system to take you to the wilderness center to pick up your permit, and then to the trailhead.
Visalia also has hotels that allow long-term parking, so you can leave your car at one of those places for a fee. The best part? Most hotels are on the paid shuttle route. Convenient, right?

3. Public Transportation (kind of)
The Eastern Sierra Transit Authority, VLINE, Sequoia Shuttle, and Amtrak are key to this plan.
The ESTA has routes from Reno, NV to Lone Pine, CA and another route that connects Mammoth Lakes, CA to Mojave, CA (both of these routes stop in Mammoth Lakes and Lone Pine).
You’re going to have to hitch hike from Whitney Portal to Lone Pine, but it’s not that hard to do because of all the people at the Portal all summer. You could also look into this shuttle service, which is accredited to work in Inyo National Forest.
From Mojave, CA, your best option is to take Amtrak to Bakersfield and then from Bakersfield to Visalia or Fresno. If your bus goes to Goshen, CA instead of Visalia, you can take Uber into Visalia. From Visalia, you’ll take the Sequoia Shuttle into the national park.
You could also take the ESTA to Mammoth Lakes and then take YARTS through Yosemite (395 route) and transfer to YARTS to Fresno (41 route). Taking YARTS through Yosemite also allows you to stay at the backpacker’s campgrounds in the park, which is convenient if the timing of the busses doesn’t align for same day travel.
Visalia and Fresno are connected via the VLINE. So if you fly into or just get to Fresno, you can take the VLINE to Visalia, then take the Sequoia Shuttle mentioned above into the park to the Giant Forest Museum.
The Sequoia Shuttle ends at the Giant Forest Museum. From there, you need to take the free National Park Shuttle Green Line to Lodgepole to get your permit, then ride it back to the Giant Forest. From there, you’ll take the Grey Line to the Crescent Meadow Trailhead. The free park shuttles run every 15 minutes.
There is no backpacker-specific lodging or camping in Sequoia like there is in Yosemite. You’ll need to start hiking the day you arrive, or have front-country camping secured (Lodgepole campground is best for this), or stay at the Wuksachi Lodge inside the park (free park shuttle only runs here on weekends & holidays though).
Whatever method you end up doing, make sure you reserve seats ahead of time if the service allows it.
I would HIGHLY RECOMMEND doing all of the long public transportation stuff before your hike starts vs. after when you’re tired and smelly.
Another recommendation I have is to try to fly into Fresno and then fly out of Reno if you are coming from out of state. This would negate the back-tracking process across the Sierra, and make the shuttle transportation easier on both ends of your hike.
4. Paid Shuttle Service
This is another option. You can drive your car to your ending trailhead, and then hire a private shuttle to take you to your starting trailhead.
I am not going to recommend any services here because I did not use any and I have seen some very cautionary comments on Facebook and Reddit groups about one of the most popular “services” for this.
For this reason, I’d recommend joining the HST Facebook group. It is well-moderated with people who are passionate about the trail and giving people good advice for rides accurate for the year.

5. Car Key Swap
You can also use the Facebook group to coordinate a key swap with another party that is hiking the opposite direction from you. Or if you have a friend who wants to hike, just without you.
Obviously, key swaps require the right conditions and a lot of trust, so decide if that will work for you.
6. Hitch-hiking
Hitch-hiking is definitely an option! I would recommend going the northern route through Yosemite if you do this option since I perceive it to be safer.
People along Highway 395 and Tioga Road in Yosemite are used to hitch hiking backpackers due to JMT and PCT thru-hikers. Your biggest issue is going to be getting into Yosemite when entry reservations are required and then getting back to Fresno from Yosemite (tourists are less likely to pick up hitch hikers). But you can take YARTS from Yosemite to Fresno as I described above.
7. Hike Out-and-Back
This one is a little longer and you’ll need to carry a lot more food, but you could just tag the Mt. Whitney summit, turn around and hike back to Crescent Meadow! This would make the trip a 120 mile hike.

Resupplying on the High Sierra Trail
There are no resupply options on this trail, nor are they necessary.
We did see some hired packers doing resupply services for a large group that was taking 2 weeks to complete the trail, so it may be worth looking into if you feel you cannot carry enough food for a week.
Bears & Other Wildlife
The Sequoia National Park wilderness is black bear country! They are very common and that’s the reason you need to store your food and toiletries in approved bear-proof containers during your trip.
I used the BV500 bear canister on my thru-hike of the HST.
Bears are generally not an issue though. If you do come across one, consider yourself lucky. Make your presence known to them by being loud, but back away and give them space to move away from you. The only time you should make a big commotion or bluff charge a bear is if they are trying to encroach on a space where you are camped with food.
Note that bear spray is prohibited in Sequoia National Park, so don’t bring any.
Mosquitoes will probably be the most annoying wildlife you encounter, and they can be fierce in mid-summer. We encountered the most mosquitoes in Big Arroyo on our hike. I always recommend treating your clothes with permethrin and carrying picaridin to ward off mozzies.
Other animals you’re likely to see: mule deer, marmots, pika, squirrels and chipmunks, and rattlesnakes! Be prepared, and remember, never interact with a wild animal!
Water Availability
Water is plentiful on the High Sierra Trail, and you shouldn’t need to worry about long water carries for most of the hiking season. Your longest carry will likely be between Big Arroyo and Moraine Lake (or Chagoopa Creek depending on route) and from Guitar Lake to Trail Camp in the Whitney Zone.
Make sure you’re always treating your water! The Sawyer Squeeze is my favorite water filter. I’ve used it for thousands of miles of backpacking!

Leave No Trace in the High Sierra
Brush up on the principles of Leave No Trace.
This entire trip takes place in designated wilderness. Designated wilderness in the United States has special rules for recreation which state that motorized and mechanical equipment is not allowed to be used. This means that items like drones, bikes, and strollers can’t be used here.
It is important to stay on the established trail, even if it is muddy or covered in water, which can be possible on this trail in the early season.
You must camp and go to the bathroom at least 100 feet away from water sources and any trail. Make sure you pack out all of your toilet paper and trash – leave nothing but footsteps behind so we can all enjoy this wonderful place for many years to come.
Training for Thru-Hiking
As with most hikes, my training philosophy is: training will make the hike easier, and make you less susceptible to injury, but even if you don’t train, as long as you give yourself an appropriate itinerary, you will probably be just fine.
So yes, put a weighted pack on and hit the Stairmaster as much as possible, go on as many training hikes as you can, but if you can’t fit that many into your schedule, you will probably be OK.
If you are sticking to trails in the Sierra (vs. cross-country, off-trail routes), you’ll find they are pretty forgiving, as they are graded for stock use. Just don’t try to break any speed records, and try to lighten your pack weight as much as possible to make up for the fact you’re going to have to carry more food if your trip is long.
Acclimatization is a worthy endeavor, however. If you can stay for 1-2 days in the Lodgepole area before starting your hike, especially if you are coming from sea level, your lungs will thank you, and you will be less likely to acquire AMS.

Gear Needed for the High Sierra Trail
You can read about my exact gear list from my 2019 hike here. I also included post-hike commentary based on my experience.
But since it’s 2025, you should check out my updated gear list which I now use on 95% of all of my backpacking trips.
Wag Bag Information
Wag Bags are required on this hike since you are entering the Whitney Zone. You are not allowed to dig a hole to poop in in the Whitney Zone because our solid waste doesn’t break down fast enough in the rocky soil there.
A Wag Bag is a dual-layered bag that you open up, poop in, close, and carry with you. You should get one from the rangers when picking up your wilderness permit, or you can buy them from REI ahead of time.
It’s really sad, but you’ll see rude hikers leaving their wag bags along the trail to “pick up later”. Don’t be this person. Marmots are very interested in wag bags, and will try to eat through the plastic to get to your waste, plus, who wants to hike in beautiful wilderness and see shit bags left alongside the trail?! Not me. Carry your wag bags with you at all times.
p.s. if you’re planning to camp above treeline – like at Precipice Lake, Kaweah Gap, or Guitar Lake, you’ll need to use a wag bag there as well.

Early Season Gear
If you’re planning to hike in a high snow year or in the late spring, you should be prepared with microspikes and trekking poles at the very least.
When I hiked Mt. Whitney in late June, I needed to use microspikes and my poles because there was snow on the trail. It wasn’t extensive enough that I needed to use my ice axe, but I also had that with me.
In a high snow year, the trail areas around Mt. Whitney and between Hamilton and Precipice Lake and Kaweah Gap can be downright dangerous in the early season. You should be prepared for mountaineering conditions with crampons and an ice axe, and know how to use them safely.

Paper Maps
Tom Harrison maps are my favorite, and this map has the entire HST in great detail.
FarOut Hiking Guides
I’ve used FarOut Guides on tons of my thru-hikes like the Pacific Crest Trail, O Circuit in Patagonia, Colorado Trail, John Muir Trail, and more! It’s a trail guide app for your smartphone!
They’re a thru-hikers dream because it uses crowd-sourced information to give you updates about the trail like if water is running in a creek, or if a tree fell right on the best campsite at a spot.
It also has mapping software and an elevation profile graph – one of my favorite features when I just need to know if a climb is almost done! You can buy it here.
Electronics Charging
You’re probably going to need to recharge your devices on this trail since it’s a longer hike. Whether that’s your smartphone, camera, Garmin inReach, or headlamp.
I use the Nitecore 10,000 mAh battery which gives 2.5 full iPhone Pro phone charges. You might want something with more juice though if you use your devices a lot: like a 20,000 mAh battery.
Last-Minute Advice and Things I Wish I Knew Before My HST Thru-Hike
- Get an early start to each day, and try to do big climbs in the morning when you’re fresh and it’s cooler.
- Mt. Whitney is a lot colder than the rest of the trail. Make sure you bring layers for this part of the hike. Even light gloves will be great to have!
- I think the most beautiful part of this hike is the portion of trail between Hamilton Lakes and Kaweah Gap. It’s also the hardest climb (yes, even more so that Mt. Whitney)! Take your time and enjoy it!
- Don’t put your used Wag Bag in your bear canister. Keep it in your tent rainfly vestibule near your feet, not head, and be prepared to scare off any critters that are interested in it.
- Treat yourself to a burger at the Whitney Portal Cafe after your trip, OR breakfast at the Alabama Hills Cafe.
Final Thoughts on Backpacking the High Sierra Trail
The HST is the perfect mini thru-hike, and I can’t recommend it enough for people who are looking for a week-long journey through some gorgeous terrain!
The logistics may be a little difficult to work out, the climbs may be grueling, but you’ll forget all the planning and pain once you’re out enjoying the views.
If you have any questions about anything I’ve written here, don’t hesitate to ask in the comments below! I’m always happy to help.
And come back here and learn about the John Muir Trail after you’re done with the HST. I know you’ll have the Sierra thru-hiking bug after this trip!
Pin For Later

